Construye un piano con este sencillo tutorial
Realizar un piano usando una placaArduino es un proyecto muy interesante y fácil de hacer. No va a ser una versión convencional de un piano, pero vas a realizar una que con la que podrás tocar unas cuantas melodías. Aquí, vamos a hacer un piano que se puede utilizar para tocar los tonos básicos de una canción. Para este proyecto no hace falta ser músico profesional, solamente tener un Arduino Uno y las ganas de realizar un divertido proyecto. !Vamos allá!
Componentes necesarios:
- Arduino Uno
- Un teclado
- Un Altavoz de 1W, con un pequeño altavoz de juguete nos vale (Piezo Buzzer)
- Unos pocos cables
Diagramas
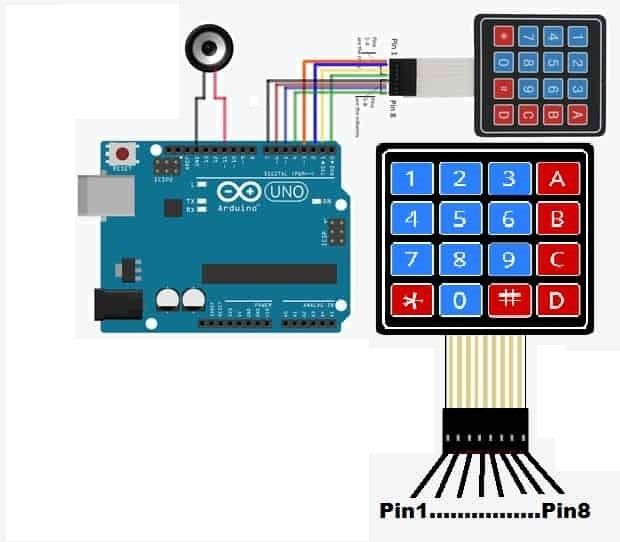
| Pin Arduino | Teclado de izquierda a derecha |
3 | Pin1 |
2 | Pin2 |
1 | Pin3 |
0 | Pin4 |
7 | Pin5 |
6 | Pin6 |
5 | Pin7 |
4 | Pin8 |
| Altavoz y Buzzer | |
12 | a un terminal |
Gnd | a otro terminal |
Código
Antes de cargar este código a tu placa Arduino necesitas añadir la librería’ keypad.h’ a Arduino IDE. Para ello has de ir a la carpeta raíz del Arduino IDE y pegar el archivo descomprimido de descarga del enlace de arriba en la carpeta’ Libraries’.
Ten en cuenta lo siguiente: necesitas conectar el altavoz o el buzzer sólo al pin PWM. Aquí lo hemos conectado al pin 12, que es un pin PWM.
    #include
    #include "pitches.h"
    #define GND 12
    const byte ROWS = 4; //four rows
    const byte COLS = 4; //four columns
    const int SPEAKER=11;
    //define the symbols on the buttons of the keypads
    char hexaKeys[ROWS][COLS] = {
    {'0','1','2','3'},
    {'4','5','6','7'},
    {'8','9','A','B'},
    {'C','D','E','F'} };
    byte rowPins[ROWS] = {3, 2, 8, 0}; //connect to the row pinouts of the keypad
    byte colPins[COLS] = {7, 6, 5, 4}; //connect to the column pinouts of the keypad
    //initialize an instance of class NewKeypad
    Keypad customKeypad = Keypad( makeKeymap(hexaKeys), rowPins, colPins, ROWS, COLS);
    void setup()
    {
    Serial.begin(9600);
    pinMode(GND,OUTPUT);
    digitalWrite(GND,LOW);
    }
    void loop()
    {
    char customKey = customKeypad.getKey();
    if (customKey=='0')
    {
    Serial.println(customKey);
    tone(SPEAKER,NOTE_C4,350);
    }
    if (customKey=='1')
    {
        Serial.println(customKey);
        tone(SPEAKER,NOTE_D4,350);
     }
    if (customKey=='2')
    {
        Serial.println(customKey);
        tone(SPEAKER,NOTE_E4,350);
      }
      if (customKey=='3')
    {
        Serial.println(customKey);
        tone(SPEAKER,NOTE_F4,350);
      }
      if (customKey=='4')
    {
        Serial.println(customKey);
        tone(SPEAKER,NOTE_G4,350);
      }
    if (customKey=='5')
    {
        Serial.println(customKey);
        tone(SPEAKER,NOTE_A4,350);
      }
      if (customKey=='6')
    {
        Serial.println(customKey);
        tone(SPEAKER,NOTE_B4,350);
      }
      if (customKey=='7')
    {
        Serial.println(customKey);
        tone(SPEAKER,NOTE_C5,350);
      }
      if (customKey=='8')
    {
        Serial.println(customKey);
        tone(SPEAKER,NOTE_D5,350);
      }
      if (customKey=='9')
    {
        Serial.println(customKey);
        tone(SPEAKER,NOTE_E5,350);
      }
      if (customKey=='A')
    {
        Serial.println(customKey);
        tone(SPEAKER,NOTE_F5,350);
      }
      if (customKey=='B')
    {
        Serial.println(customKey);
        tone(SPEAKER,NOTE_G5,350);
      }
      if (customKey=='C')
    {
        Serial.println(customKey);
        tone(SPEAKER,NOTE_A5,350);
      }
      if (customKey=='D')
    {
        Serial.println(customKey);
        tone(SPEAKER,NOTE_B5,350);
      }
      if (customKey=='E')
    {
        Serial.println(customKey);
        tone(SPEAKER,NOTE_C6,350);
      }
      if (customKey=='F  ')
    {
        Serial.println(customKey);
        tone(SPEAKER,NOTE_D6,350);
      }
    }